Understanding Plain Hunt is probably the most important step you will make in the journey to becoming a proficient change ringer… It is a fundamental building block on which almost all your subsequent learning will be based. Below is a video and supporting resources which explains much more about Plain Hunting. Find out how Plain Hunt works, explore the idea of coursing order and why speed and rhythm is so important. It will help you gain a much deeper understanding which will help you progress.
Understanding Plain Hunt Video
If streaming the video is not possible, or you just want more time to read, think and digest, then you will find all the content as graphics, text and audio below. Work your way through or just click the buttons to skip parts….
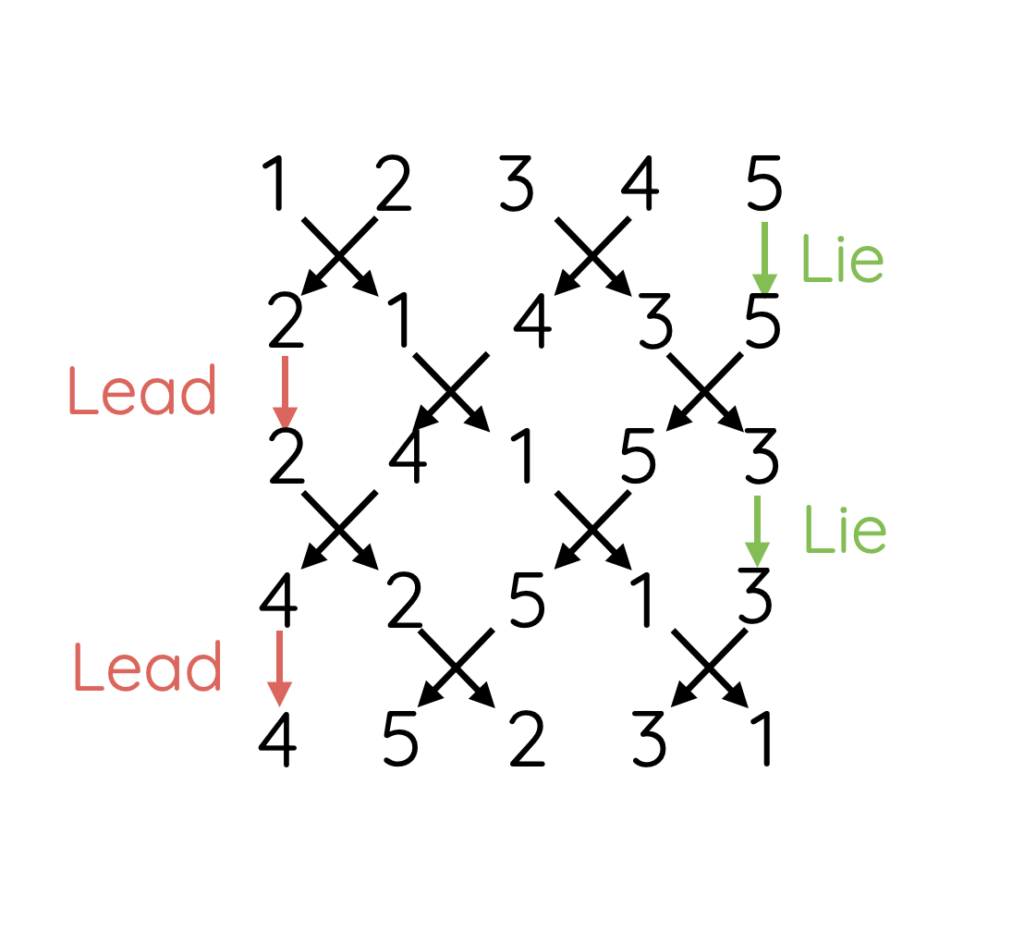
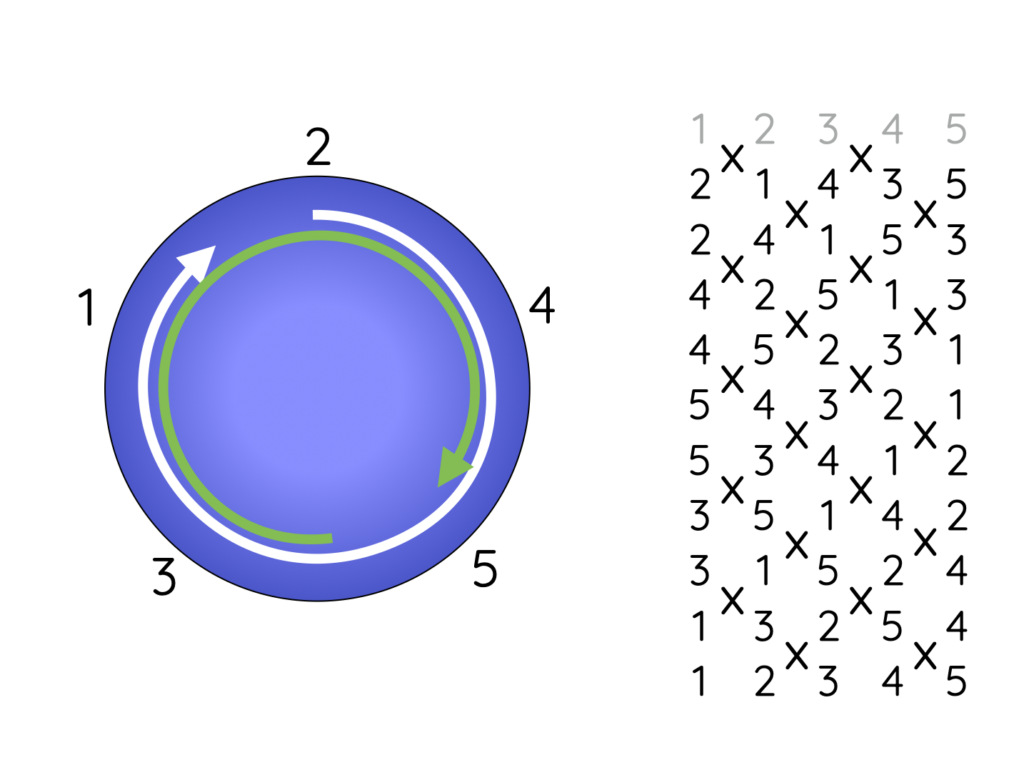
When we ring changes, we only ever swap with bells adjacent in the order.
In the simplest doubles we swap 2 pairs at a time and we alternate between the last and the first being left in position.
It means that the bells leading (first) and lying (last) will each stay for 2 blows, but may be out of step with each other…
A Doubles Sequence...
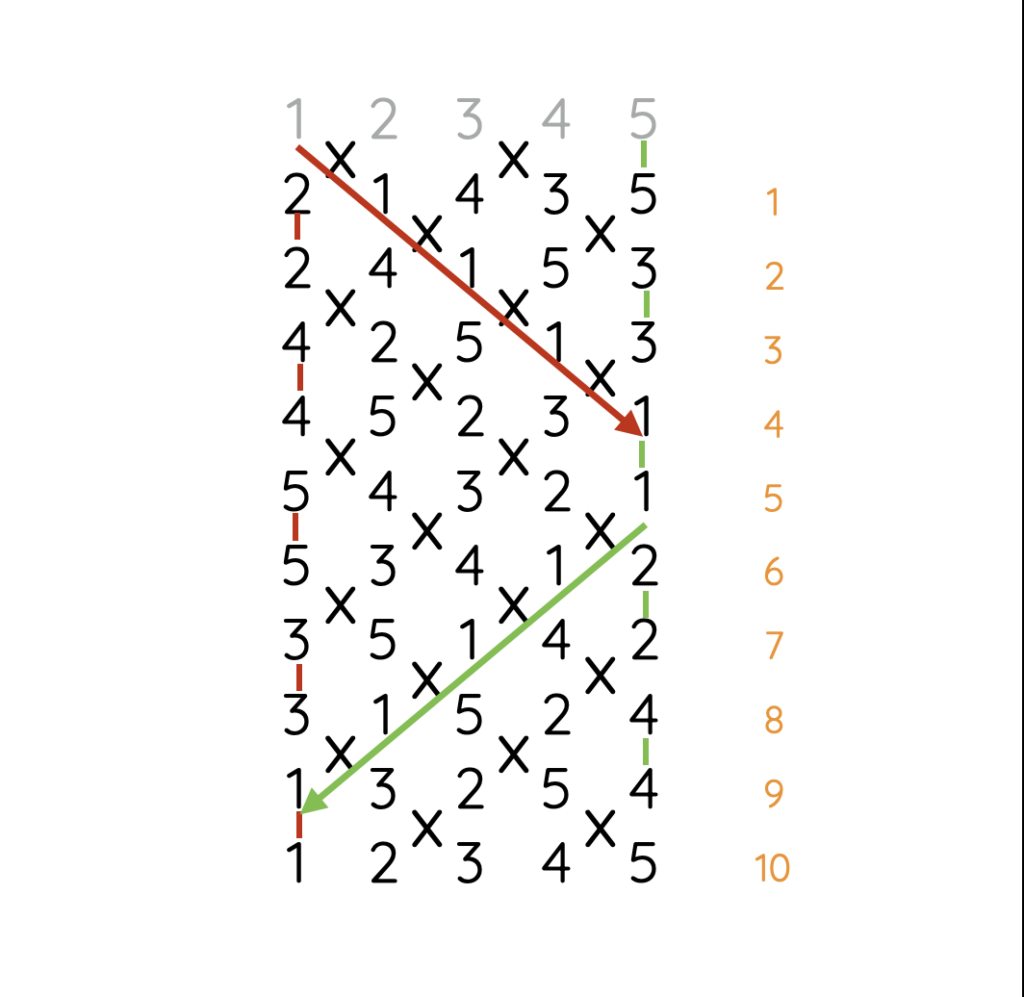
If we continue swapping alternate pairs, the bells will return to their start position after 10 changes…
This is enough to be in each position twice…
once when moving to the right (i.e. getting later in the change)
…and once moving left (i.e. getting earlier).
So for Triples we will need 14 changes, for Caters, 18 changes and Cinques, 22 changes.
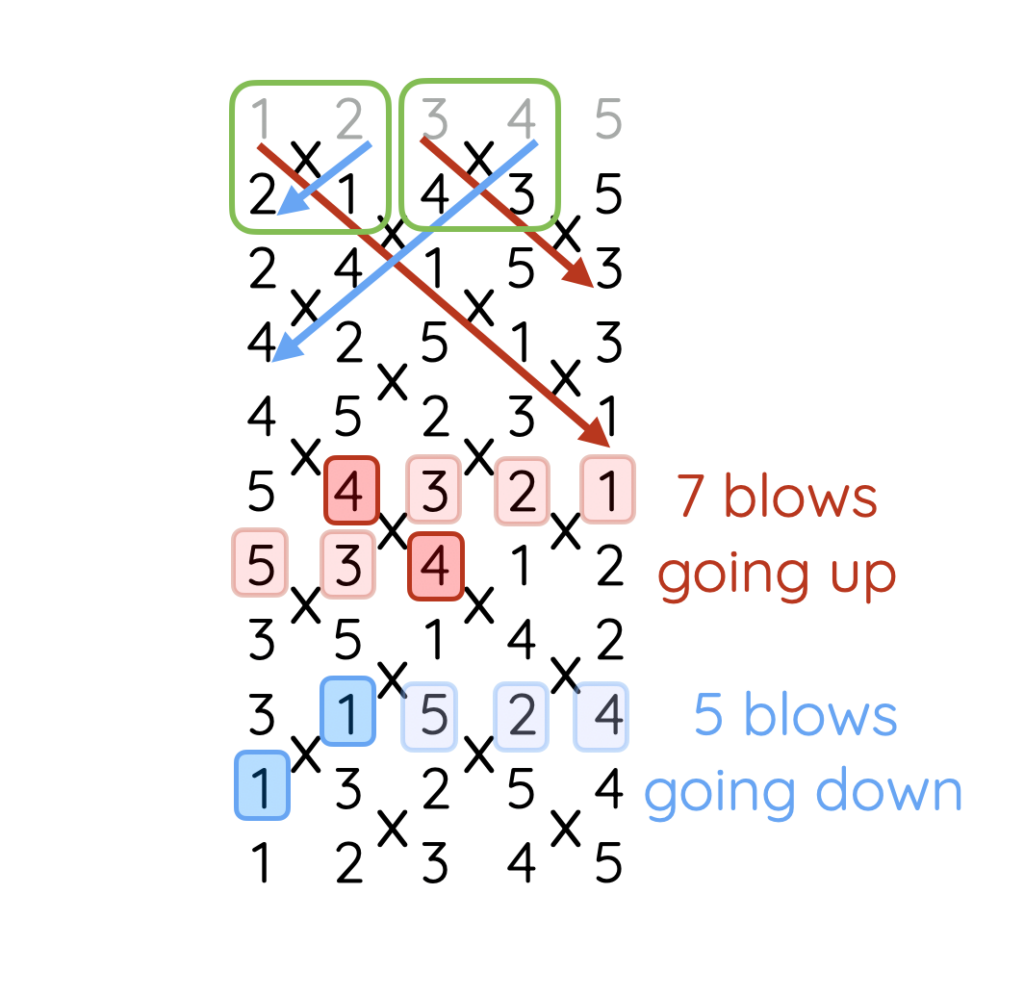
A Pattern...
Because the bells swap from the left.. e.g. 1&2 then 3&4… It means the odd bells start by moving to the right and all the even bells to the left.
This is why you might be told the starts are “odd bells go up and even bells go down”.
It means that there will be 7 blows (beats) between each strike on the way up, but only 5 on the way down.
So the ‘up’ bells ring a little slower to allow the bell they swap with to pass.
The ‘down’ bells will ring a little faster to overtake the bell they swap with.
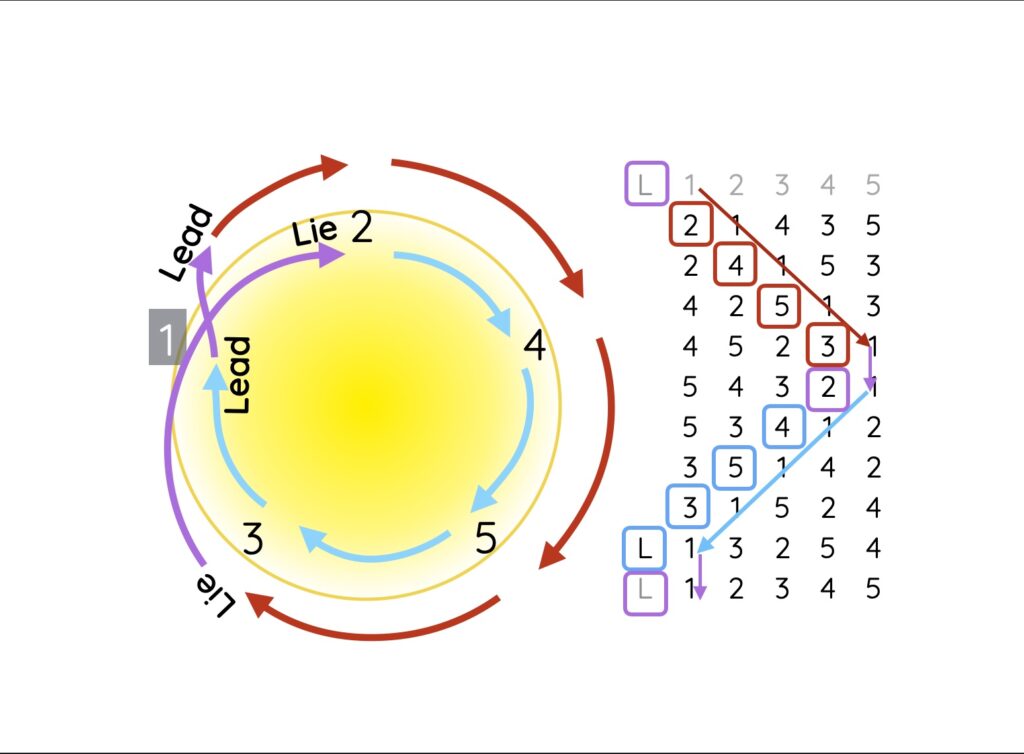
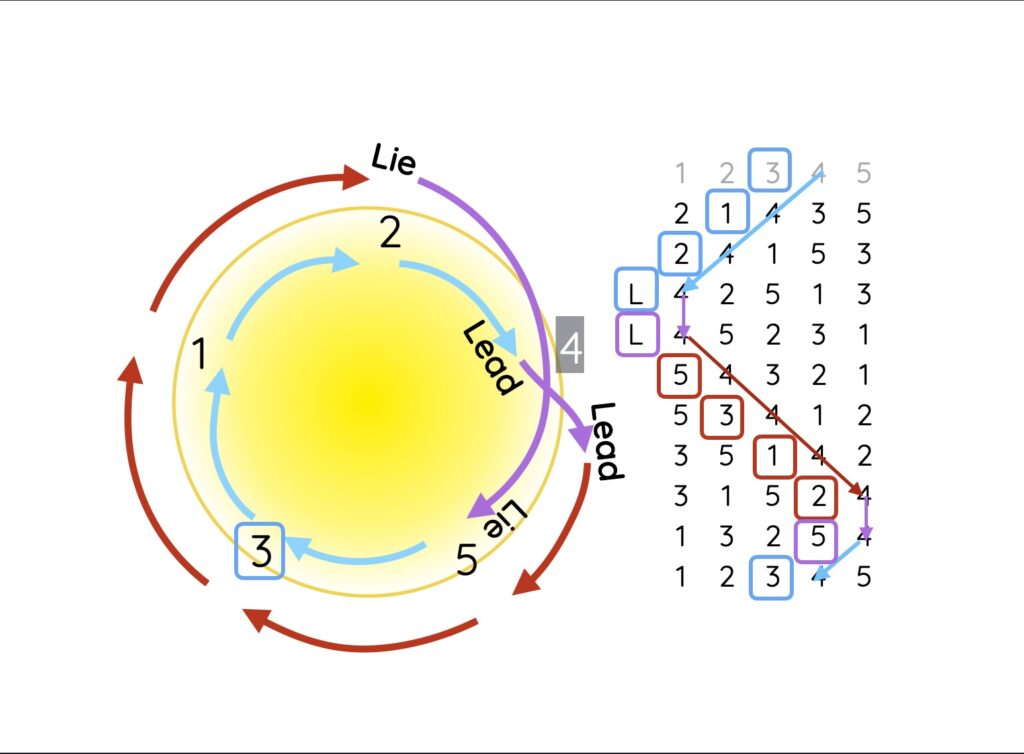
A Bigger Pattern...
If we look at the order the bells reach the front and lead, it is 2 first, followed by 4, 5, 3 and 1…
If we look at when they are last, it starts with 5, then 3, 1, 2, 4 and finally 5 again.
This is a cyclic pattern…. and the same for both… just starting at a different points.
A Circle..
We can show the lead and lie pattern as a circle with the bells leading and lying as you follow around the circle.
The white arrow for leading…
The Green Arrow for the lying.
Understanding Plain Hunt Audio Examples
Ringing by Rhythm
Listen carefully to the clips. Try and pick out the treble and hear the different speeds it rings at.
What you should hear is:
Normal during the first 6 rounds,
Slowly for the five changes moving up to 5th place,
One normal speed as it turns
5 quicker blows as it moves back to 1st place and leads.
Listen to the clips in sequence, before going back to the original version… can you still hear the treble?
1. All bells equal...
This version is clean… all the bells can be heard at the same level and therefore picking out the treble is hard.
2. Just the treble...
Now the Treble on its own.. all the other bells are filtered out. It is easy to hear the treble going slowly to the back and ringing quicker on the way back down.
3. An outstanding treble...
The other bells are now added back very quietly… you can still easily hear the change of speed in the treble from up to down.
4. Nearly balanced...
The other bells are only a little quieter in this version… but your ears should now be getting accustomed to what you are listening for, so you should still be able to pick out the Treble.
Understanding Plain Hunt Loops
The Treble Loop...
This circular graphic shows how the treble moves with the other bells in Plain Hunt Doubles.
The treble is already leading when we start, so start from the Lead just above the ‘1’.
Follow the red line, as you hunt up (slowly).
When you get back to your own number (in this case 1) you are lying over the bells adjacent before and after (3 & 2).
Continue by hunting down using the blue line until you reach your number again… now you lead.
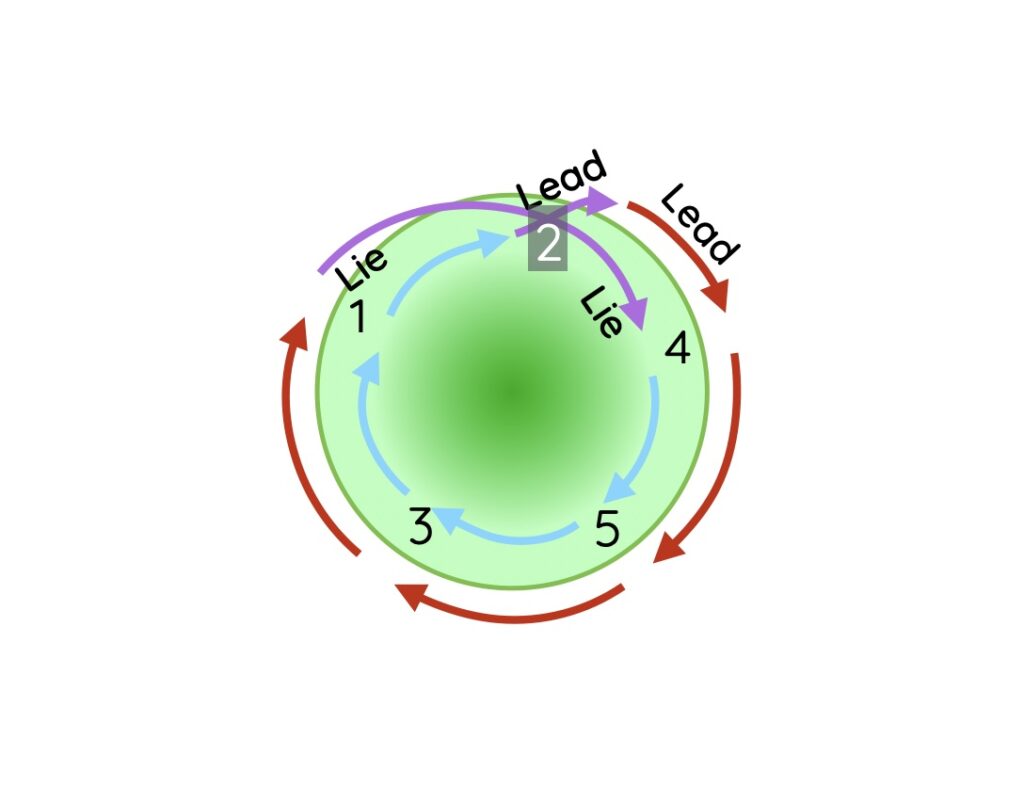
Fourth place Loop...
Use this graphic to understand how you pass bells in Plain Hunt Doubles.
Start from the bell you follow in rounds… in this case, bell 3.
Hunt down (more quickly) until you reach your own number, following the blue line. Now you lead.
Following the red arrows for Hunting up (more slowly) until you reach your own number. Now you are last.
Use the blue arrows to start hunting down again (ringing quicker).
Continue by hunting down using the blue line until you reach your number again… now you lead.
Second place Loop...
Instruction as per the previous slides…
Remember 2 starts by following 1, so start the from 1… which means you immediately get to your own number…. so lead next!
Continue by hunting down using the blue line until you reach your number again… Now you lead.
Fifth place Loop...
The 5th starts from rounds by following 4, so start the circle from 4… you immediately get to your own number, so you are last!
Follow the purple/blue arrows down (quicker)… and lead when you get to your own number!
Use the red arrows on the way back up (slower).
When you get to 4, you will have reached the back, because it is last number before your own. Because the 5th is also the biggest bell, it is also back to where you started from!
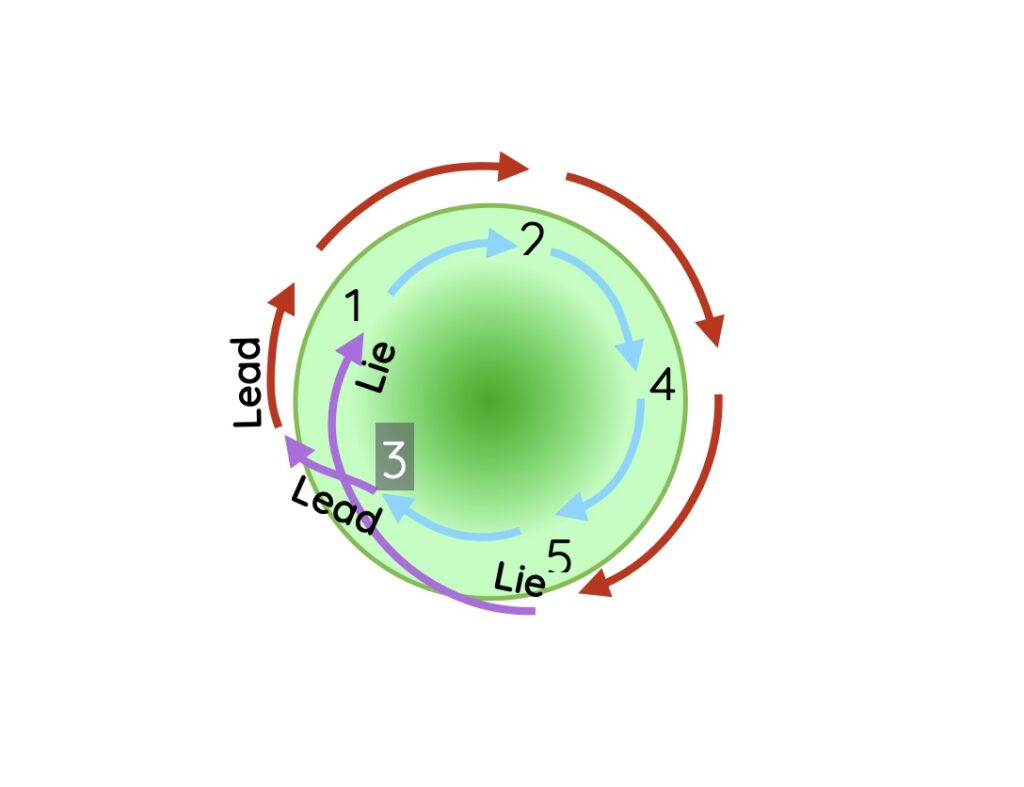
Third place Loop...
As per previous slides… start from the bell you follow in rounds… so number 2!
Use the red arrows until you reach your own number, which indicates you are last.
Follow the blue arrows around the entire loop until you get to your own number again… Now you lead!
After leading continue following the red arrows…
Example eight bell Loop...
This graphic works exactly the same as the other loops. It is bigger, to accommodate 8 bells, but shows how it could be extended to any number.
Choose the bell you are ringing… and start from the bell you would be following in rounds… (in this case bell 3, so start at 2)
For odd bells, initially follow the red arrows (up – ring more slowly)
For Even bells follow the blue arrows (down – ring more quickly).
You will lead or lie when you get to your own number.
Alternative views of understanding Plain Hunt...
You will, by now have realised that although Plain Hunt sound simple enough, the practicality of trying to remember all the things you learn is quite hard… especially if you are also struggling with bell handling!
Below are three links to blogs or pages written by and for fellow learners from other guilds and groups… the underlying message is: don’t give up, because it does take time and application.
We promise, that getting this bit right is well worth the investment as it is key to further progress!